We're going to be one year old in two days!!! As an early present, we have a new URL and new hosting location which is http://www.twotoolscooking.com/. Please update your bookmarks!
The Two Tools, Bernie & Eddie.
Monday, January 10, 2011
Monday, January 3, 2011
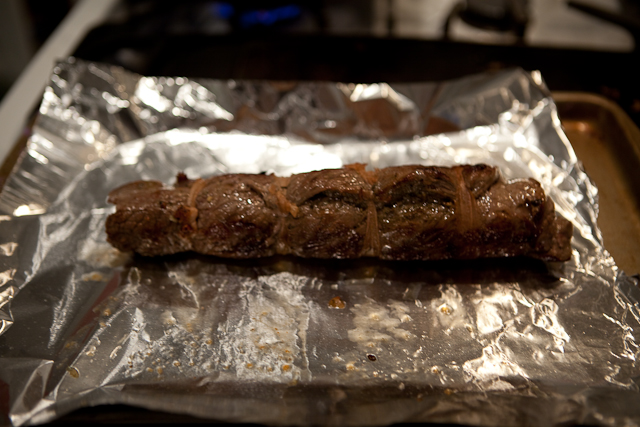
Flank Steak Spiral w/ mushroom sauce

I found this receipe over the holidays when visiting my sister. The ingredients were straightforward and I had the bulk of them in the house already. It only takes about an hour to cook including prep, so this can be made on a work night if you get home early enough (you can prep the night before and will only take 30 minutes to cook/heat. On to the meal!
Software:

- 1 3/4 pound flank steak
- 8 oz. sliced mushrooms
- 2 minced garlic cloves
- 2 tbs grated parmigiano cheese
- 1 tbs chopped sage
- 1 tbs chopped rosemary
- 1/2 cup red wine
- 1/2 cup beef broth
- 1 tsp corn starch
- s&p (of course)
- *2 tbs. balsamic vinegar (added this to recipe)

Start by turning on the oven to 375. Next, pound the steak til it's about 1/2 inch flat. ( if you can get it to be rectangular, it helps). I used the handy Oxo Good Grips Meat Pounder. As mentioned in a earlier post, a small cast iron pan would do the trick as well.

Grate the cheese til you get 2 table spoons. (Microplane 40020 Grater/Zester is a must)

Combine it with the garlic, sage, and rosemary in a bowl. Spread the mixture on one side of the steak


Wednesday, December 29, 2010
Seduction by induction
Happy Holidays! due to the hectic holiday schedule I've been terrible about getting this post out. I have the week off and we've been shuttling between Jen's Family Christmas in the Poconos and my brother's in Manhattan. Not to mention a whopping Blizzard of 2010. We've only had 23 inches of snow caked on top of us. Jersey City looked like it was styrofoamed packed at least the first day. Then it turned grey like it usually does for city snow.
This year brought a bag full of culinary gadgets for me to play with. It was only a few years ago when induction burners were hundreds of dollars now they've dropped tremendously and you can pick one up under 100$. This year Jen's side of the family opted for Kris Kringle instead of individual gifts and our cousin's Brenda's Boyfriend Peter had me. After some sneaky holiday talk with Jen I opened up an single induction burner for Christmas.

Now if you're wondering what the heck am I going to do with a single induction burner the idea is that I can cook certain volatile dishes in the back patio instead of in the kitchen. For example, when I fry up a batch of french fries I can do it without the entire house smelling like a fast food restaurant for days. Also when I want to get a hot sear on a steak I can do it without setting off every fire alarm in the house. The greatest reason of all however is that I just really wanted to play with it and see what the big deal is.
How does it work? Induction cooking uses a electric coil underneath a scratch resistant glass top. The coil generates and electromagnetic field that reacts with the "ferrous" (magnetic stuff in metal) in your cooking vessel. This completes an electrical current that heats up the vessel and the ingredients that are in it. If you're unsure if your vessel will work. Use the magnet test. If it sticks, it'll do. Okay enough science class let's have some fun.
For anyone considering upgrading their kitchen stove top to induction there are some very real perks to induction. For one you have much more precise control over your heating power for the control freaks out there. Cleanup, the glass that you cook on it is scratch resistant a since its flat without crevices it a breeze to clean up, no more gunky stove tops. Sleek, its a very futuristic look in comparison to the traditional gas burners. Quick, the heating element heats up very quick and can boil a pot of water within just a few minutes. Safer, no more worries of jumping flames once the pan is off the burner the heat dissipates quickly and there isn't a threat of fire.
So let's see if this thing lives up to the hype. I decided to start off with a very typical Filipino American breakfast. Garlic Rice, Kielbasa, and Scrambled egg with grilled onions.
Software:
4 cups of cooked day old rice
3 stalks of sliced scallions
SnP
Polish Smoked Kielbasa
1 Small Onion
4 Eggs Scrambled
4 Cloves of minced garlic
Vegetable Oil
Hardware:
Skillet
Knife
Microplane *Optional
Induction Burner
If you don't have day old rice lying around I suggest you start with getting the rice started. I like to use a rice cooker because its very forgiving with the amount of water you put in and it allows you to keep your burners free to cook other items. My brother like making rice in a pot over a flame but I kinda like setting the rice up and walking away.


Once the rice is going I suggest you get your "Mise En Place" together. Slice up your sausage, onions, and scallions. I dusted off my ceramic Kyocera chef's knife for this. I love to slice vegetables with my ceramic knives. Ceramic retains it sharpness longer than the traditional steel. Ceramic is much lighter than steel so you won't tire out as you will with prepping for a long time with steel. Inexpensive, ceramics tend to cost 30% less in comparison to your high end traditional steel chef's knife. Now the draw backs... ceramics, are more fragile it will not take a long drop and it will not cut through bone. It also will not hone with a traditional honing steel you will need a special ceramic honing bar to condition your blade. All in although it's great for vegetable cutting and Jen loves it due to it's light weight feel. It's the knife you want to choose when you have allot of prep work without any butchery.


I picked my cast iron to use on the burner. I start with about 2 tablespoons of vegetable oil and turned the burner on 3. Instead of mincing garlic, a shortcut I take is grating the garlic on a microplane. Just be sure to take the papery skin off of the garlic before grating and be careful of your fingers. Skin and blood in your meal is not good eats. Once the garlic begins to brown throw your rice in and using your spatula break up any of the really large chunks. Toss the rice for about 5 minutes and SnP. Cut the fire and add the sliced scallions. Now after this first round I started to notice that there is a very prominent hot spot dead center of the pan. Lets see how well it does with the kielbasa.


Wash your pan or use a new pan and preheat with about a tablespoon of vegetable oil. Add the sliced kielbasa and over medium heat brown your sausage and set aside. For round two, the hot spot is much more prominent in the center of the pan. With the sugar in the sausage it burned quickly and it was difficult to scrape off. I also noticed that since I used an oblong pan the sides furthest most from the center were pretty cool and did little or no cooking. I had to brown in the center then set it off to the side like a short order cook on a griddle.


So we're not doing so great so far. Now for the onions and eggs. Saute the onions in a teaspoon of vegetable oil and add the egg, SnP and set aside. Same story for round 3 very hot in the center and very cool on the sides. This kept me hovering over the cooking process and constantly tending to the ingredients being cooked. It was also difficult to know how hot the numbers meant in comparison to flames. With gas you can visually see how high you are blasting your pan but with a digital panel it's difficult without some practice to know how hot is hot.


So here's the verdict, induction is a convenient way to cook. It gets hot quick, its easy to clean, and its sleek and sexy but it can produce hot spots and its difficult to understand how hot your pan is. I wouldn't swap out my gas grill but I'm happy to have a secondary back up for outside cooking.

Here are some pros' and cons I've noted.
Pros: Sleek look, Easy to clean, precise heat control, quick cool down, Cool digital display, Little carry over heat, no gas line needed, no live fire risk, quick heat up and cool down.
Cons: Hot spots, does not work with copper pans, Digital display hard to gauge pan temperature, oblong pans don't do well, and if you're used to tossing your ingredients in the pan the loss of contact instantly stops the heat.
Tuesday, December 21, 2010
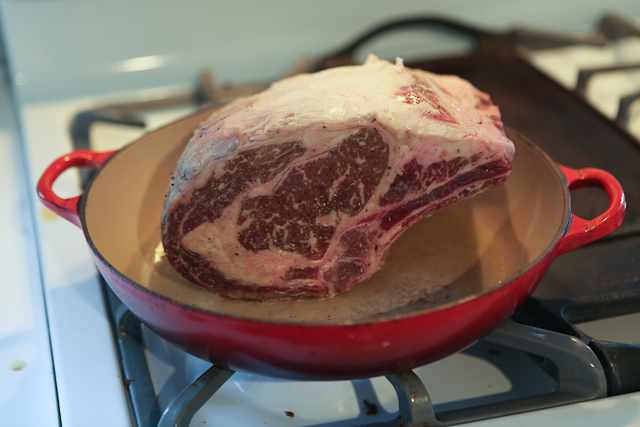
The Perfect Prime Rib

- 3-Bone beef rib roast ~ 6 lbs.
- 3 tbs. flaky sea salt (fleur de sel)
- 1 1/2 tbs. fresh black pepper
- 1 tbs. olive oli
- 8 sprigs fresh rosemary (i had some frozen)
- 8 sprigs fresh thyme
- 10 cloves of garlic peeled and smashed
- 3 tbs. butter (cut into slices)


Sunday, December 12, 2010
Wanna S'Mac?
Cooking for kids can be tough, especially when you consider yourself a bit of a foodie and you want to pizazz up your food. In your head you think you'll make a dish so well for a kid that they will have an "aha" moment and the clouds will part and they truly understand what good food tastes like. That usually doesn't happen. They usually taste whatever it is you made and prefer the version that came out of the box and tastes like cardboard. Funny how that works.
My nephews are big on Mac N' Cheese and it would always be a treat to make it for them around the holidays. My brother hates most dairy products so his household is void of dairy for most of the year. Well its a treat for me to cook for my nephews and my brother's family and it's usually a treat for them to have something drowned in cheese. I tend to make the mistake of making it too fancy and kids tend to get a bit bummed when it doesn't taste like Velveeta, butter, and pasta. Well this year for Changsgiving I decided to shop out my dish and leave it up to a recipe. It had to be simple, kid friendly and something close to Mac N' Cheese.
After picking up a new BBQ cookbook from one of our Favorite BBQ joints in the city "Dinosaur's BBQ" I was eager to try something out of their cookbook. Surely they had to have Mac N' Cheese as a desirable BBQ side dish. Sure enough page 48 "Dinosaur Style Macaroni and Cheese Shepard's Pie", perfect!
Software:
3 Tablespoons of Kosher Salt
1 Pound of Small Pasta Shells
1 Tablespoons of Vegetable oil
2 Cups of Chopped Onion
1 Cup of Chopped Green Bell Pepper
5 Large Garlic Cloves Chopped
1 1/4 Pounds of Ground Beef
1 Tablespoon of freshly ground Pepper
1 Tablespoon of BBQ Sauce
1/4 Cup of Unsalted Butter
1/4 Cup of AP flour
1 1/2 Cups of Half and Half
3 Cups of Shredded Sharp Cheddar
1 Cup of grated Parm Cheese
2 Teaspoons of Dijon Mustard
Tabasco Sauce Optional.
Hardware:
Pot to boil past
Strainer
High walled skilled or Dutch Oven
Your favorite knife. *Today I whipped out the Kyocera Ceramic
Chopping block
Spatula
9 by 13 baking dish
First you want to get your oven going at 375 Degrees Fahrenheit. Preheat the oven as you start to prep and assemble your mise en place.
Start a full pot of boiling salted and lubed (oil) water for the pasta.
In the skillet add your oil, half the onions and half the peppers. Just saute them lightly you don't want them to take on any color so medium heat please.

 Add the garlic once the onions start to look translucent. Down in Cajun country they would call this trio the Holy Trinity and its used as a base for anything from Jambalaya to Red Beans and Rice. The french would have their take and call it mirepoix and the Spanish would call it Sofrito. Basically they are all an onion mixture with two or more vegetables or herbs that would be used as a flavor base for most of their dishes.
Continue to cook the garlic, onion, pepper mixture for about another minute.
 Add the ground beef and SnP. Sautee until the mixture looks like a dark brown and the pan caramelize bits of the beef fat. Add the BBQ sauce, scrape up the caramelized goodness on bottom, and set aside to cool.


 This is good time to add the pasta to the boiling water.
 Clean out your skillet and melt the butter on a medium flame. Add the rest of the onions and peppers and sautee until translucent like before. Now add the flour and continually scrape the bottom of the skillet. This is called a roux and is also widely used in southern cooking. Roux's are generally a fat (butter, Lard, oil) and flour cooked into a paste of varying degrees of brown. Roux's are also the first step to a Bechamel sauce which is one of the master sauces in the cooking world. With a Bechamel you can create anything from an Alfredo sauce to a New England Clam Chowder.

 This is a good time to drain your pasta. Make sure your pasta is a good young al dente remember it will continue to cook when you bake it.

 As the roux goods you need to continually scrape it and DO NOT leave your pan. It burns easily and once it burns there's no recovery other than starting scratch. Take the half and half and nuke it up or warm it up in a pot while your scraping and whisking. Now add your cream slowly and you will see the roux incorporate into it making a nice cream base for your cheese sauce.
Once fully incorporated add half of your Cheddar and all of your parm. SnP to your liking and add the cooked pasta.

 Now get out a 9 by 13 casserole dish and add the beef mixture first then the pasta with sauce on top. Finally top with the remaining Cheddar and place in the oven for 30 minutes until its bubbling and delicious.


 The irony is that for Changsgiving the kids didn't like it up much and we ended up taking it up and ate it for the next few days. Although I thought the kids would love it and the adults the opposite I was dead wrong. The kids didn't care for it but the adults liked it. Eh what can you do? I'll get them next year!
My nephews are big on Mac N' Cheese and it would always be a treat to make it for them around the holidays. My brother hates most dairy products so his household is void of dairy for most of the year. Well its a treat for me to cook for my nephews and my brother's family and it's usually a treat for them to have something drowned in cheese. I tend to make the mistake of making it too fancy and kids tend to get a bit bummed when it doesn't taste like Velveeta, butter, and pasta. Well this year for Changsgiving I decided to shop out my dish and leave it up to a recipe. It had to be simple, kid friendly and something close to Mac N' Cheese.
After picking up a new BBQ cookbook from one of our Favorite BBQ joints in the city "Dinosaur's BBQ" I was eager to try something out of their cookbook. Surely they had to have Mac N' Cheese as a desirable BBQ side dish. Sure enough page 48 "Dinosaur Style Macaroni and Cheese Shepard's Pie", perfect!
Software:
3 Tablespoons of Kosher Salt
1 Pound of Small Pasta Shells
1 Tablespoons of Vegetable oil
2 Cups of Chopped Onion
1 Cup of Chopped Green Bell Pepper
5 Large Garlic Cloves Chopped
1 1/4 Pounds of Ground Beef
1 Tablespoon of freshly ground Pepper
1 Tablespoon of BBQ Sauce
1/4 Cup of Unsalted Butter
1/4 Cup of AP flour
1 1/2 Cups of Half and Half
3 Cups of Shredded Sharp Cheddar
1 Cup of grated Parm Cheese
2 Teaspoons of Dijon Mustard
Tabasco Sauce Optional.
Hardware:
Pot to boil past
Strainer
High walled skilled or Dutch Oven
Your favorite knife. *Today I whipped out the Kyocera Ceramic
Chopping block
Spatula
9 by 13 baking dish
First you want to get your oven going at 375 Degrees Fahrenheit. Preheat the oven as you start to prep and assemble your mise en place.
Start a full pot of boiling salted and lubed (oil) water for the pasta.
In the skillet add your oil, half the onions and half the peppers. Just saute them lightly you don't want them to take on any color so medium heat please.


Continue to cook the garlic, onion, pepper mixture for about another minute.


Once fully incorporated add half of your Cheddar and all of your parm. SnP to your liking and add the cooked pasta.


Subscribe to:
Posts (Atom)